A Silicone Mold - Explanation of Urethane Casting
How is a Silicone Mold Made for Urethane Casting?
The RTV (Room Temperature Vulcanization) casting process is a common method used to create silicone molds for a variety of applications. This process involves making a silicone mold using a master pattern or prototype. Here are the steps involved in making a silicone mold using the RTV casting process:
Prepare the master pattern: The first step in the process is to create a master pattern or prototype. This can be made from a variety of methods but is usually made via 3D printing. The master pattern should be the exact replica of the final product, including all details, textures, and dimensions. At Broadview we find that SLA (stereolithography) models offer the best balance of feature detail, surface finish and easy or priming and sanding. This process also works well for recreating existing parts that are no longer commercially available (i.e. vintage cars and boats).
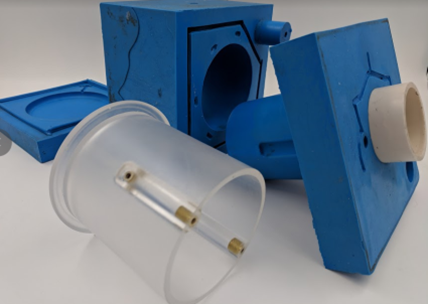
Create a mold box: A mold box is created around the master pattern using a rigid material such as plastic or wood. This mold box will serve as a frame for the silicone mold.
Mount the master part to a surface using plastic or wood, this part will be used in pouring the first mold half. Apply clay to carefully form the parting line for the second pour, thus blocking off the silicone and creating the parting line and mold half surface that you need for the second pour.
Apply release agent: A release agent is applied to the master pattern and the inside of the mold box. This release agent prevents the silicone from sticking to the master pattern and the mold box.
Mix and pour the silicone: The silicone material is mixed according to the manufacturer's instructions and poured into the mold box. The silicone will flow around the master pattern, capturing all details and textures. Once poured, the silicone mold is pressurized to reduce air bubbles, then allowed to cure for a specific time.
Now for pouring the other mold half, after removing the clay and reapplying mold release to the master and cutting the locating featuring into the mold, you are ready to pour the second half.
Once the silicone is fully cured, the mold is removed from the mold box. The master pattern is carefully removed from the silicone mold. Adding gates, vents and other features, leaving behind a negative impression of the pattern. Now you are ready to cast your prototype parts…..more on this in an article to follow……..
